重定位函数在generate compiler里面
devlink驱动封装里面gs_mount_table 里stdio open函数控制外围;
open herity是个好东西
io滚动条右滑
s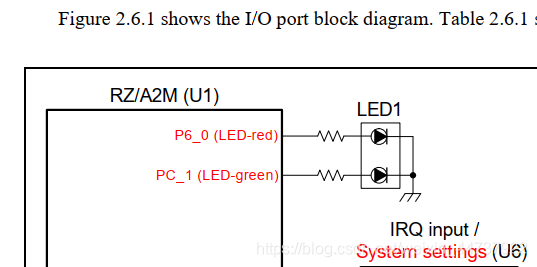
io要双击设置
osless用的是定时器中断
组件没加,添加组件要下载
遇到版本问题
右键修改cpg和ostm_reserved版本,问题解决
点灯流程如下:
smart configuration里面开gpio,开定时器(在component 添加ostm,设置计数值和回调函数名)
定义句柄
static int_t gs_my_gpio_handle;
句柄赋值
gs_my_gpio_handle = direct_open(“gpio”, 0);
然后在定时器的回调函数里面调用
direct_control(gs_my_gpio_handle, CTL_GPIO_PIN_WRITE, &gs_p60_hi);和direct_control(gs_my_gpio_handle, CTL_GPIO_PIN_WRITE, &gs_p60_lo);,形成blink效果
注意定时器也要打开
int_t ostm_handle;
ostm_handle = direct_open(“ostm0”, 0);
direct_control(ostm_handle, CTRL_OSTM_START_TIMER, NULL);
结构体:
static st_r_drv_gpio_pin_rw_t gs_p60_hi =
{
GPIO_PORT_6_PIN_0,
GPIO_LEVEL_HIGH,
GPIO_SUCCESS
};
static st_r_drv_gpio_pin_rw_t gs_p60_lo =
{
GPIO_PORT_6_PIN_0,
GPIO_LEVEL_LOW,
GPIO_SUCCESS
};
但是自己建的工程还是不行
用压缩包示例文件
debug configuration设置就好了
修改定时器,ok
配另一个灯