Cobbler由python语言开发,是对PXE和 Kickstart以及DHCP的封装。融合很多特性,提供了CLI和Web的管理形式。更加方便的实行网络安装。同时,Cobbler也提供了API接 口,使用其它语言也很容易做扩展。它不紧可以安装物理机,同时也支持kvm、xen虚拟化、Guest OS的安装。更多的是它还能结合Puppet等集中化管理软件,实现自动化的管理。
PXE 预启动执行环境(Preboot eXecution Environment,PXE,也被称为预执行环境)是让计算机通过网卡独立地使用数据设备(如硬盘)或者安装操作系统。
Cobbler提供以下服务集成:
* PXE服务支持
* DHCP服务管理
* DNS服务管理
* 电源管理
* Kickstart服务支持
* yum仓库管理
本机:系统Centos6.5_x64
ip : 192.168.10.128
1、安装Cobbler
|
1
|
[[email protected] ~]#yum install cobbler httpd rsync tftp-server xinetd dhcp python-ctypes cman pykickstart debmirror -y
|
1.1、Cobbler命令说明
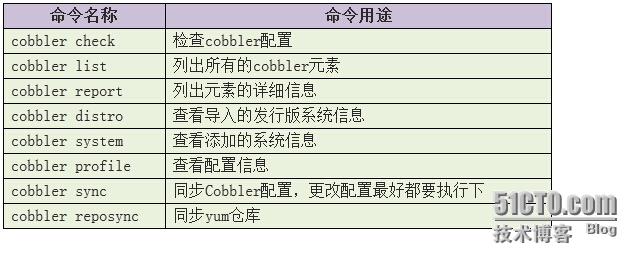
命令参考
cobbler --help
cobbler distro --help
cobbler distro add --help
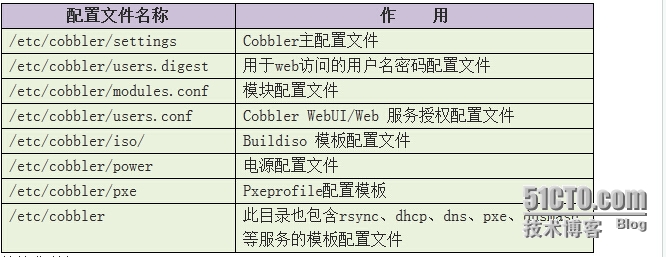
1.2、Cobbler配置文件说明
Cobbler配置文件存放在/etc/cobbler下
-
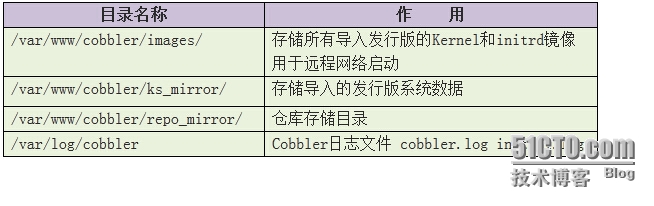
3 系统镜像数据目录/var/www/cobbler
导入的系统发行版,repos镜像和kickstart文件都放置在/var/www/cobbler目录下。确保/var目录有足够的空间来存储这些文件。
-
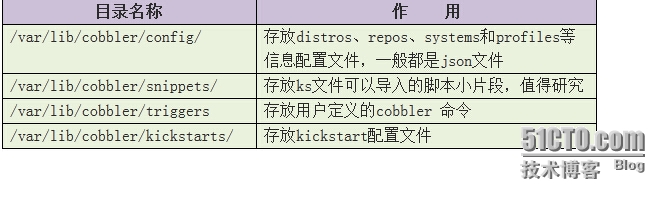
4 Cobbler数据目录/var/lib/cobbler
此目录存储和Cobbler profiles、systems、distros相关的配置
1.5 相关日志文件
------------------------------------------------------------------------------------------
web日志存放点
/var/log/httpd/access_log
/var/log/httpd/error_log
/var/log/httpd/ssl_access_log
/var/log/httpd/ssl_error_log
Cobbler日志
/var/log/cobbler/cobbler.log
/var/log/cobbler/install.log
通过Cobbler日志可以获取系统的安装状态
--------------------------------------------------------------------------------------------
1.6 配置Cobbler
[[email protected] ~]# vim /etc/cobbler/setting
|
1
2
3
4
5
6
|
242 manage_dhcp: 1 ##启用cobbler管理DHCP功能
261 manage_rsync: 1 ##启用cobbler管理rsync功能
246 manage_dns: 0 ##启用cobbler管理dns,这里没有开启
272 next_server: 192.168.10.128 ##DHCP服务地址
292 pxe_just_once: 1 ##预防将机器中的安装循环配置为始终从网络引导
384 server: 192.168.10.128 ##cobbler服务器地址
|
1.7配置tftp、rsync
|
1
|
[[email protected] ~]# sed -i '/disable/c\\tdisable\t\t\t= no' /etc/xinetd.d/tftp
|
|
1
|
[[email protected] ~]# sed -i 's/\=\ yes/\=\ no/g' /etc/xinetd.d/rsync
|
启用wsgi模块;Python应用程序或框架和Web服务器之间的一种接口
|
1
2
|
[[email protected] ~]# cat /etc/httpd/conf.d/wsgi.conf
LoadModule wsgi_module modules/mod_wsgi.so
|
1.8 生成Cobbler安装系统root初始密码 # 这里生成**和配置默认**,后面ks文件引用、
|
1
2
3
4
|
[[email protected] ~]# openssl passwd -1 -salt 'random-phrase-here' 'password'
$1$random-p$sFftrCTxKKsDZ.Sdr8mDG0[[email protected] ~]# vim /etc/cobbler/settings +101
101 default_password_crypted: "$1$random-p$sFftrCTxKKsDZ.Sdr8mDG0"
|
1.9 配置DHCP
|
1
2
3
4
5
6
7
8
9
10
|
[[email protected] ~]# vim /etc/cobbler/dhcp.template
21 subnet 192.168.10.0 netmask 255.255.255.0 { # 分配所属网段
22 option routers 192.168.10.2; # 默认网关
23 option domain-name-servers 192.168.10.2; #dns ip
24 option subnet-mask 255.255.255.0; #掩码
25 range dynamic-bootp 192.168.10.200 192.168.10.254; # 分配地址段
26 filename "/pxelinux.0"; ##指定的网络引导程序
27 default-lease-time 21600; #租约时间,秒
28 max-lease-time 43200; #最大租约时间,秒
29 next-server 192.168.10.128; #指定的TFTP服务器的地址
|
编辑dhcp配置文件,不然可能无法启动dhcp
|
1
2
3
4
5
6
7
8
9
10
11
12
13
14
15
16
17
|
[[email protected] ~]# cat /etc/dhcp/dhcpd.conf |grep -v ^# |grep -v ^$
ddns-update-style interim;allow booting;allow bootp;ignore client-updates;set vendorclass = option vendor-class-identifier;
option pxe-system-type code 93 = unsigned integer 16;
subnet 192.168.10.0 netmask 255.255.255.0 { option routers 192.168.10.2;
option domain-name-servers 192.168.10.2;
option subnet-mask 255.255.255.0;
range dynamic-bootp 192.168.10.200 192.168.10.254;
filename "/pxelinux.0";
default-lease-time 21600;
max-lease-time 43200;
next-server 192.168.10.128;
}
|
启动服务:
|
1
2
3
4
|
/etc/init.d/xinetd start
/etc/init.d/dhcpd start
/etc/init.d/cobblerd start
/etc/init.d/httpd restart
|
2.管理cobbler
|
1
|
[[email protected] ~]# cobbler get-loaders
|
2.1 编辑debmiror
|
1
2
3
|
2.2 检查cobbler配置 # 我们的防火墙及selinux已经关闭,下面提示先不管
|
1
2
3
4
|
[[email protected] ~]# cobbler check
The following are potential configuration items that you may want to fix:1 : since iptables may be running, ensure 69, 80/443, and 25151 are unblocked
Restart cobblerd and then run 'cobbler sync' to apply changes.
|
2.3 完成后运行cobbler sync 命令让配置生效,使dhcp、http被cobbler接管,不然会报错
|
1
2
3
4
5
6
7
8
9
10
11
12
13
14
15
16
17
18
19
20
21
22
23
24
25
26
27
28
29
30
31
32
33
34
35
36
37
38
39
|
[[email protected] ~]# cobbler sync
task started: 2014-09-11_082844_synctask started (id=Sync, time=Thu Sep 11 08:28:44 2014)
running pre-sync triggers
cleaning treesremoving: /var/lib/tftpboot/pxelinux.cfg/default
removing: /var/lib/tftpboot/grub/grub-x86_64.efi
removing: /var/lib/tftpboot/grub/efidefault
removing: /var/lib/tftpboot/grub/images
removing: /var/lib/tftpboot/grub/grub-x86.efi
removing: /var/lib/tftpboot/s390x/profile_list
copying bootloaderstrying hardlink /var/lib/cobbler/loaders/grub-x86_64.efi -> /var/lib/tftpboot/grub/grub-x86_64.efi
trying hardlink /var/lib/cobbler/loaders/grub-x86.efi -> /var/lib/tftpboot/grub/grub-x86.efi
copying distros to tftpbootcopying imagesgenerating PXE configuration filesgenerating PXE menu structurerendering DHCP filesgenerating /etc/dhcp/dhcpd.conf
rendering TFTPD filesgenerating /etc/xinetd.d/tftp
cleaning link cachesrendering Rsync filesrunning post-sync triggers
running python triggers from /var/lib/cobbler/triggers/sync/post/*
running python trigger cobbler.modules.sync_post_restart_servicesrunning: dhcpd -t -qreceived on stdout: received on stderr: running: service dhcpd restartreceived on stdout: 关闭 dhcpd:[确定]正在启动 dhcpd:[确定]received on stderr: running shell triggers from /var/lib/cobbler/triggers/sync/post/*
running python triggers from /var/lib/cobbler/triggers/change/*
running python trigger cobbler.modules.scm_trackrunning shell triggers from /var/lib/cobbler/triggers/change/*
*** TASK COMPLETE *** |
3 上传ISO镜像至服务器
3.1 上传ISO镜像至服务器
|
1
2
3
4
5
6
7
|
[[email protected] ~]# mkdir -p /opt/os/Linux/x64/Centos6.5/dvd
[[email protected] ~]# mkdir /opt/os/Linux/x64/Centos6.2/dvd -p
[[email protected] ~]# mkdir /opt/iso
[[email protected] iso]# pwd
/opt/iso[[email protected] iso]# ls
CentOS-6.2-x86_64-bin-DVD1.iso CentOS-6.5-x86_64-bin-DVD1.iso |
3.2 挂载ISO镜像
|
1
2
|
[[email protected] iso]# mount -o loop /opt/iso/CentOS-6.5-x86_64-bin-DVD1.iso /opt/os/Linux/x64/Centos6.5/dvd/
[[email protected] ~]# mount -o loop /opt/iso/CentOS-6.2-x86_64-bin-DVD1.iso /opt/os/Linux/x64/Centos6.2/dvd/
|
3.3 从DVD中导入OS数据
系统版本命名为centos6.5 架构x86_64,这时间长,耐性等待。可查看ls /var/www/cobbler/ks_mirror/centos6.5-x86_64/目录文件生成情况。
|
1
2
3
4
5
6
7
8
9
10
|
[[email protected] iso]# cobbler import --path=/opt/os/Linux/x64/Centos6.5/dvd/ --name=centos6.5 --arch=x86_64
task started: 2014-09-14_051537_importtask started (id=Media import, time=Sun Sep 14 05:15:37 2014)
Found a candidate signature: breed=redhat, version=rhel6Found a matching signature: breed=redhat, version=rhel6Adding distros from path /var/www/cobbler/ks_mirror/centos6.5-x86_64:
creating new distro: centos6.5-x86_64************省略Keeping repodata as-is :/var/www/cobbler/ks_mirror/centos6.2-x86_64/repodata
*** TASK COMPLETE *** |
查看导入的信息
|
1
2
|
[[email protected] ks_mirror]# ls
centos6.2-x86_64 centos6.5-x86_64 config |
3.4 列出导入后的配置
|
1
2
3
4
5
6
7
8
9
10
11
12
13
|
[[email protected] ~]# cobbler list # # 列出详细信息可以使用cobbler report
distros: centos6.2-x86_64
centos6.5-x86_64
profiles: centos6.2-x86_64
centos6.5-x86_64
systems:repos:images:mgmtclasses:packages:files: |
查看配置是否存在
|
1
2
|
[[email protected] ~]# cobbler profile find --distro=centos6.2-x86_64
centos6.2-x86_64 |
删除配置文件
|
1
|
[[email protected] ~]# cobbler profile remove --name=centos6.2-x86_64
|
删除distro
|
1
|
[[email protected] ~]# cobbler distro remove --name=centos6.2-x86_64
|
查看配置是否存在(已无) ##删掉后重新import下。便于后面安装测试多版本系统选择
|
1
|
[[email protected] ~]# cobbler profile find --distro=centos6.2-x86_64
|
4.ks文件
4.1 定义ks文件,更改kickstart文件,可为http等,具体cobbler --help查看,这里采用我们自定制ks文件
默认ks文件位置,以.ks结尾 # 其中 sample.ks 为默认的ks文件
|
1
|
/var/lib/cobbler/kickstarts |
4.2 更改指定系统版本对应的ks配置文件 #也可以自己编辑
|
1
2
3
4
|
[[email protected] kickstarts]# cp sample.ks centos6u5-x64.cfg
[[email protected] kickstarts]# cp sample.ks centos6u2-x64.cfg
[[email protected] ~]# cobbler profile edit --name=centos6.5-x86_64 --kickstart=/var/lib/cobbler/kickstarts/centos6u5-x64.cfg
[[email protected] ~]# cobbler profile edit --name=centos6.2-x86_64 --kickstart=/var/lib/cobbler/kickstarts/centos6u2-x64.cfg
|
4.3 核实下配置详情
|
1
|
[[email protected] ~]# cobbler report
|
4.4 查看系统列表
|
1
2
3
|
4.5 同步Cobbler配置 ##建议先执行cobbler check进行配置检查再执行cobbler sync,修改cobbler配置后都需要执行此步骤 这里列出,字数限制
4.6 创建PXE菜单密码 增加装机安全设置菜单密码
生成hash密码
支持两种不同类型的密码: # sha1pass mypassword 或 openssl passwd -1 -salt sXiKzkus mypassword
|
1
2
|
[[email protected] ~]# openssl passwd -1 -salt leo lansgg
$1$leo$RWzbs9Ic6zwRbYj9qpkHp. |
4.7 编辑装机密码
|
1
2
3
|
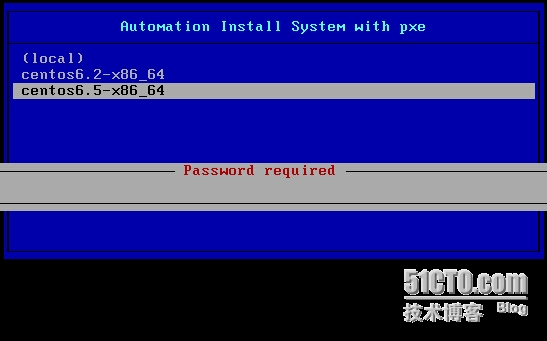
[[email protected] ~]# vim /etc/cobbler/pxe/pxedefault.template
MENU TITLE Automation Install System with pxe #修改
MENU MASTER PASSWD $1$leo$RWzbs9Ic6zwRbYj9qpkHp.#新增
|
|
1
2
|
[[email protected] ~]# vim /etc/cobbler/pxe/pxeprofile.template
MENU PASSWD #新增
|
一样进行 cobbler check ; cobbler sync
PXE装机时选择装机系统版本,输入装机密码,效果图 #这里密码为lansgg
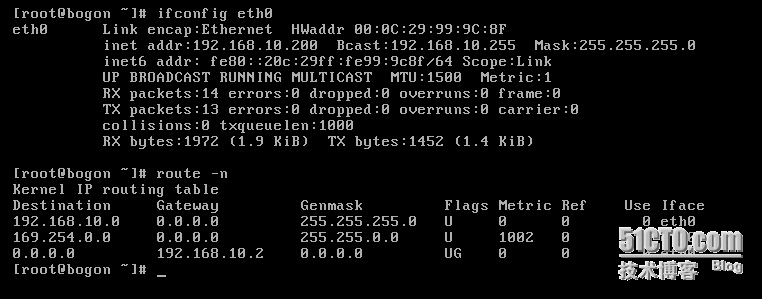
测试系统已经装好;密码是password (上面配置好的)
本文转自 西索oO 51CTO博客,原文链接:http://blog.51cto.com/lansgg/1552525